Healthy Reptiles

For Happy Healthy Reptiles

PETsMART

Thursday, November 30, 2006

Moisture For Mealworms


Like all insects mealworms need a moisture to thrive and reproduce. There is a ton of info out there on the web on this subject. In our years of breeding insects we have tried all the methods of providing moisture. Adding water directly to the substrate will cause mold and kill your colony. We have worked out several methods to successfully provide moisture to our meal worm colonies.

First you can use a simple paper towel folded in half or quarters, add some water and squeeze out the excess. Place the paper towel on the top of the substrate. This can still cause mold. So you need to leave the top off the mealworm tray. Check the mealworm colony frequently and make sure there is no mold. Now the best way to provide moisture is from sliced vegetables. We have been using potato slices or whole carrots.

The mealworms get their moisture directly from the vegetables and receive nutritional value as well. In a few days all you need to do is dig through the substrate and remove the dried vegetables. In the last few years we have discovered what we believe is the best moisture source there is.

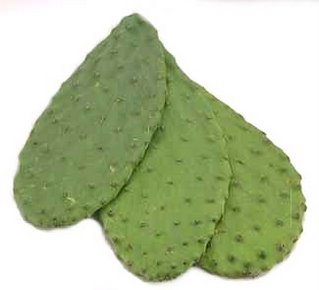
The nopal cactus (opunita streptacantha ). We slice the nopal cactus pads into strips and place these on top of the substrate. When the worms are finished the only thing left is the thin skin of the cactus. This species of cactus has few thorns and the few there are can be removed easily with a knife. We have had absolutely no problems with mold and have found that the mealworms consume the cactus before any other moisture source. If you have access to nopal cactus we strongly recommend trying it as a moisture source for your mealworms.

Thursday, November 23, 2006

Potting Soil?


Many breeders recommend potting soil or garden soil for your crickets egg laying medium. We have found that many of the potting soil has pesticides that will kill your crickets. Or the soil is full of molds and fungi that with water and heat can quickly kill your cricket eggs. For store bought soil we recommend boiling the soil in water to kill all the mold and fungi. But this doesn't always eliminate the pesticides. Garden soil can be even more dangerous. I f you don't know your soils history, it can also be full of pesticides that will kill your crickets. Often times garden soil is full of other insects eggs. So you could spend a lot of time nurturing you cricket eggs just to find that you have incubated spider or earwig eggs. The best bet is to read our previous post about egg laying medium. It is better to spend a little money in the beginning to ensure you have a healthy first generation of crickets.

Cricket Eggs


In our years of cricket breeding we have discovered some good tips for caring for cricket eggs. First, you need to make sure you are using the right egg laying medium. The medium is where your crickets will be laying their eggs. We use a mix of vermiculite and pearlite. We mix about 50/50. Next we blend the mix. This helps make the granules smaller. Then we add a little water, and mix well. It should have just enough water to squeeze into a crumbly ball. But should not drip when squeezed. The proper egg laying medium is essential for healthy eggs. Our next article will discuss the pros and cons of using soil for your egg laying medium. Attention to detail can really make breeding crickets easy. Just the same, poor quality materials often results in poor numbers in baby crickets or the loss of you entire colony.

Tuesday, November 21, 2006

Cricket Culture


Housing:
Crickets can be kept or raised successfully in large jars, cans, aquaria or boxes 18 to 24 inches deep and as wide as possible. If a screen top is not provided, the sides of the container must be waxed in order to prevent escapes. Clean, dry sand is a good floor cover. Crickets can breed and grow rapidly at temperatures between 80 and 90 degrees F. If this temperature cannot be maintained, heat should be provided by an electric lamp suspended about 12 inches above the floor of the container.

Care:
Poultry mash or Startena, a commercially prepared food, in a shallow dish is a good food. Lettuce greens may be offered sparingly once a week. Water may be provided in inverted test tubes with cotton plugs, in a water fountain such as is used for watering chickens, or in a shallow bowl with rocks in to prevent the crickets from drowning. Crickets do best if kept clean, dry and warm. Daily attention is needed in order to insur they have clean water and food available. Dead crickets and droppings must be removed at least weekly. Crickets will not thrive or reproduce if these basic procedures are not followed.

Reproduction:
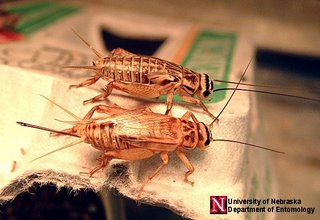
The female cricket is readily distinguished by the ovipositor, the organ with which she deposits her eggs. The ovipositor is a long, narrow tube originating from the rear of the abdomen. It is nearly as long as the body of the cricket. Twenty to thirty adults are all that are necessary to start a culture. The eggs are laid in moist sand (provide a separate container) and hatch in 8-20 days. Crickets do not breed untilthey are two to three months old. As many as 400 crickets can be raised every three months in a can 24 inches in diameter.

Care of Crickets


Crickets have been kept in captivity for thousands of years because the singing of the adult males is considered pleasant by many people. More recently they have been kept by many people as a live food source for a great variety of carnivorous animals. However they can be kept purely for the joy of watching them as they are attractive and active little animals with a real charm of their own.

Housing

An aquarium with a tight fitting wood/mesh lid makes a good cage, the lid is to prevent the crickets from jumping, or climbing out, it needs to have ventilation holes as free flowing air is essential for the health of the cricket, a fine wire, or plastic mesh is ideal.

Though they can be kept at house temperature, in colder climes they will be more active and sing better if given some warmth, an electric light or a heat pad are useful sources of heat, a temperature of around 30 degrees is successful for most species. Most species of cricket seem happy with a regime of 16 hours of daylight to 8 hours of night including the primarily nocturnal Acheta domesticus . Furthermore most species need some sort of cover to hide in, egg cartons, the cardboard inners from toilet rolls or inverted polystyrene cups all make suitable hideaways. However making a small wood pile of dry and rotting branches 3cm to 6cm diametre by about 15cm long, or a pile of bark pieces, in one end of the tank works equally well and looks far more attractive. In the base of the tank there should be 5cm to 10cm of a peat substitute compost, this should be dampened occasionally.

Water.

Water should be made available in a shallow bowl filled with cotton wool which should be changed as it gets dirty, alternately water can be supplied in mini inverted drinkers similar to those used for poultry.

Feeding.

All crickets are omnivorous and in the wild some species are carnivorous by choice, if crickets are not kept well fed they will prey on one another. However they are easy to feed and most things can be used as food. I have found that a combination of rolled oats and bran flakes with fresh fruit and vegetables will suffice to keep them happy. Most dry dog and rabbit foods will do as well and they also like green peanuts such as you would by for a bird feeder.

Breeding.

The females will lay their eggs in the damp cotton wool, or in the soil if this is provided; the cotton wool which should be changed twice a week. The old cotton wool should be placed in a well ventilated plastic box in a warm airing cupboard and not allowed to dry out. The eggs should hatch in a week or two, depending on the temperature. The young and the adults can be kept together providing they have plenty of food. I have found that if the top of the cage is not lighted then breeding is much more difficult. I would also recommend African black crickets Gryllus spp. rather than browns Acheta domesticus for the beginner, They breed more easily, sing more lustily and they also make better food for frogs and lizards etc., as they grow bigger.

To learn more about Orthoptera (Crickets and Grasshoppers) in general visit the Earthlife WebOrthoptera Page at www.earthlife.net/insects/orthoptera.html.

Raising Crickets


Introduction
The house cricket (Achetus domesticus) is a staple and nutritious food for many herp species. Obtaining a reliable supply of these insects can be a bother, especially if one requires a constant supply of newly hatched 'pinhead' crickets, to say nothing of the costs of feeding a large collection with pet-shop-bought crickets. The following article outlines a method for cricket raising which has been developed over the past two years in order to provide a collection of frogs (Mantellas, Discophus, and Dendrobates) with a constant supply of small and large crickets.

There are several things to consider before you decide to raise crickets:

  • The crickets will make a lot of noise. You must have an area to keep them where this is not a problem.

  • Escapes will be inevitable! Eventually you might find yourself falling asleep (or not falling asleep) to the trill of a cricket courting in the warmth beneath an appliance in your room. If you live in an apartment your neighbors may find new, unwanted, tenants in the hallways. Commercial insecticide pellets such as those used to kill earwigs can be placed in the room with your cricket colony to prevent escapees from taking over the house.

  • Crickets have a definite odor, but if the colony is well maintained and kept clean, most people do not find it offensive. A major source of odor is the cotton wool in the water dishes which can quickly collect droppings so it must be kept clean. In the method described here, the main colony is kept dry (no damp substrate) which reduces the smell considerably.

One of the main problems encountered with most descriptions of cricket breeding is that the eggs hatch in the same container as the adult breeding colony, usually in a substrate placed on the bottom of the breeding enclosure. This requires one to sort the crickets before feeding to various sized animals. The breeding substrate also quickly becomes littered with dead crickets and droppings. It is also difficult to keep moist if egg cartons or other hiding material is placed on top of it.

The method described here provides a removable egg-laying container, separating the eggs and adults, thereby raising yields and providing crickets of various sizes. Depending on the number of crickets desired the system can be set up in the corner of a room or the bottom of a closet - space is not a major consideration. The cost to establish a basic system is about $30.00 plus the cost of the initial breeding colony of crickets. To start such a colony at least 200 crickets are required, and the colony should not be used for feeding until well established and your first babies are adult-sized. If you plan to use some of the crickets for feeding, a batch of 1000 can be purchased quite inexpensively from a cricket supplier.

Materials Required
The materials required for a basic setup are as follows:

  • 2 Large Plastic storage containers - 'Rubbermaid' or similar (Breeding containers)

  • 3 Medium sweater boxes (Rearing containers)

  • 6 - 500 ml ( 1 pint) plastic tubs (Nesting and food containers)

  • egg 'flats'

  • Heat pad (optional) - medical types available at most drug stores work well

  • Water dispenser - small chick waterer available at feed shops or specialty pet shops.

  • Several jar lids

  • Quilt batting or plastic scouring pads

  • Aluminum mosquito screening

A Description of the Basic Setup
The breeding colony is housed in one of the deep (26" x 14" x 16" deep) plastic storage boxes with egg flats inserted vertically throughout except for about 6 inches at one end where the water dispenser is located. Other containers may be adapted for this use. No substrate of any kind is placed in the bottom of this container. Holes (4" x 4") are cut in opposite ends of the breeding container and covered with metal mosquito screening secured with duct tape, to provide ventilation. (Do not use fiberglass screening, the crickets will soon eat through it and escape! Catching 1000 crickets loose in your apartment is not a task I would recommend, although I have done it, once). The water dispenser is a commercial chick waterer which is essentially a plastic jar inverted over a circular trough which holds the water. Plastic scouring pads or Dacron quilt batting should be cut to fill the trough. They will soak up water, making it available to the crickets while preventing them from drowning. The egg flats should reach to within about 4" of the top of the container. On top of these are placed two plastic tubs, such as sour cream or yogurt is purchased in. One contains food and the other contains egg laying medium.(See specific sections for descriptions of each). A heat pad is placed on top of the lid of the storage box to provide adequate warmth. Crickets thrive at temperatures higher than the average house temperature. They prefer 80-90 degrees F (26-32 C). If you place them in a warm herp room this should provide them with enough heat. At lower temperatures they will survive and even breed, but yields will be much reduced. They also seem to live longer at lower temperatures, something to keep in mind if you find yourself with an excess which you want to keep alive as long as possible.

Maintenance of the breeding colony comprises of filling the food, keeping the nesting material damp and filling the water when empty. A 1 litre waterer will last 4-5 weeks. Every 2 months or so the entire colony and fixtures should be moved to the second container. The cricket waste and ex-crickets can then be dumped out of the first container and it can be washed. It is best to do this outside, if possible, as escapes are inevitable. Over time, cricket droppings will accumulate on the egg cartons and the cartons will need replacing. The egg cartons are most easily handled if they are glued together in sets of 4 or 5 for easy removal from the container.

Feeding
Feeding the crickets the right diet is important for two reasons. Firstly the crickets need adequate nutrition to survive and breed. Secondly, the nutrition from the crickets will be passed on to your reptiles or amphibians and so it is important to keep them healthy. Crickets require a high-protein diet. Without, and often with, an adequate diet the crickets will prey on each other.

Commercial cricket foods are available in large and small quantities. The large sacks of cricket chow may not be available everywhere, check with a local feedshop. The smaller jars of cricket food sold at pet shops are very expensive and I have heard mixed results about some brand's quality and acceptability to the crickets. Tropical fish flakes have also been recommended as food but the expense is astronomical if you are raising a large number of crickets.

As an alternative, I use the following recipe. It is inexpensive and several dollars worth will last several months or more, depending on the number of crickets you are producing. The same food is used for all sizes of crickets. The food is based on commercial dried cat food. In addition I provide a supplement of 10 parts skim milk powder (by volume) to 1 part of a good quality calcium supplement intended for reptiles and amphibians. The cat food is shaken in this mixture until coated and then given to the crickets. More supplement can be sprinkled onto the food as the crickets eat it. To provide a balanced diet this is supplemented with alfalfa pellets and, whenever available, raw vegetable scraps. Top up each as they are eaten. The food can be placed in a small plastic container on top of the egg cartons in the breeding container. Crickets can be removed and 'gut-loaded' with higher quality food several days prior to feeding them to your herps if desired. However, this diet has proved sufficient nourishment for the crickets used to feed a number of amphibians and several breeding groups of Dendrobatid frogs.

Breeding the Crickets
As long as the crickets have food, water and a high temperature they will breed profusely. Their natural nesting material is damp soil and so to duplicate this a 500ml (one pint) plastic tub full of moist nesting material is placed on top of the egg cartons in the breeding container. The nesting material can be damp sand, peat moss or my favorite 'turf'. 'Turf' or 'tuff' (it is similar to coarse bonsai soil) is a landscaping material consisting of small clay based pellets which retain water well. It does not mold as easily as peat moss.

Since the crickets have no other substrate in the cage, the crickets tend to burrow into the nesting medium and disturb the eggs. However, if it is packed gently, the crickets will only disturb the top ½" or so and lay their eggs below. Use a container at least 2-3" deep so the crickets can lay their eggs down below, where they will not be disturbed. One or more of these containers can be placed in with the crickets. No matter how many containers of nesting material are placed in the container, the crickets will inevitably lay some eggs around the water dish. These generally will not hatch.

The nesting material requires constant attention. It must be checked every few days and sprayed if dry. Peat will need to be checked far more frequently than 'turf'. The nesting material can dry rapidly due to the heat pad above it. Once a batch of eggs is completely desiccated it is useless.

After 4-7 days the nesting material will be positively packed with oblate white eggs positioned vertically about 1-2" below the soil surface. The nesting dish should then be removed and incubated.

Incubation of the Eggs
To incubate the eggs, the original lid is placed on the nesting container and it is placed on the heat pad on top of the breeding container. In about 7-10 days it will be swarming with pinhead crickets and should then be moved to a rearing container. At this time, the nesting container in with the breeding colony can be removed and replaced with a new one.

Rearing the Babies
Once the eggs begin to hatch, the nesting container is moved to a small sweater box (16" x 8" x 4"). The lid of this should have holes drilled into it about 1" apart. There is little chance that the baby crickets will escape en masse through the holes, the boxes are usually too slippery for them to climb and they have little interest in leaving the food and warmth at the bottom of the container. If there is concern about escapees, a strip of wide cello-tape or packing tape can be fastened around the entire inside rim of the container. This is so slippery that the crickets will never climb it. A few small pieces of egg carton, a jar lid full of food and a jar lid with cotton wool and water are also placed in the container.

The nesting material must be kept damp and warm while the batch of crickets hatches - which can take up to a week. Snap the lid off the nesting container before placing it in the rearing box, but set it loosely back on top, with spaces for the baby crickets to get out. Without a cover, the nesting material will dry out and the water will condense inside the rearing container, drowning the baby crickets. If this is a problem, even with a covering on the nesting container, place the lid loosely on the rearing container with a gap to allow the water to evaporate. Put the nesting container at one end or the rearing container and place it on top of the heat pad to keep it warm.

Thus it is possible to heat the breeding colony, incubate several batches of eggs, and raise a batch of eggs, all on the same heating pad, within a small area. The rearing containers require more attention than the breeding colony, and the water dish must be kept damp with a spraying at least every two days. There is no doubt room for improvement in this stage of the described process.

Once the eggs have all hatched, the nesting dish is removed, the nesting material is discarded and the container recycled. Recycling the nesting material can cause problems with mold and small, mite-like insects infesting it.

The batch of hatchling crickets can be raised in the sweater box until about 1/2" long. The end result is a batch of several hundred to possibly thousands of small crickets, all of similar size, and all contained within their individual rearing container. Successive batches of crickets, each of a different size are then available to feed to your collection. The number of batches will depend on the desired output and size. Additional heating pads can be used to warm stacks of growing crickets.

Once the crickets have reached 1/4" , about 50-75 should be returned to the breeding container. This is extremely important. The adults live for only a few weeks and if the breeding colony is not replenished regularly it will die out or contain only small crickets, unable to breed yet.

Feeding the Crickets to Your Animals
The rearing containers will contain small pieces of egg crate, and the breeding container should also, if you plan to feed adult crickets to your herps. A 4 litre ( 1 gallon) square water jug works well as a cricket collector. Remove the bottom from this, and keep the screw lid on to create a large funnel.(Cover any handle holes within the jug with duct tape to prevent the crickets from hiding in them ). Remove one of the small pieces of egg crate from the cricket containers and shake it within this funnel. Hold the whole apparatus over the colony as you do this to prevent escapes. Sprinkle in calcium supplements and vitamins as required, shake gently, and tip the funnel into the herp cage.

Although these instructions for breeding crickets may sound extensive, an established colony as described can be maintained with only a few minutes of attention every few days. It must be stressed that constant care and attention is required. If you have only a few animals it may be better to purchase half-sized crickets in bulk and keep and feed them as outlined here. (Purchasing large numbers of mature crickets is not recommended unless you can use them in 3-4 weeks - their average life span). The set up as described has been found to be more than adequate to supply several hundred small (pinhead to 1/8") crickets and a few dozen adult crickets weekly. Larger outputs are possible and several breeding colonies can be set up if you have the space and the need.

Permission is granted to herpetological societies, private individuals and not-for-profit organizations to freely use and distribute this information as long as credit is given to the original author.

www.anapsid.org/crickets.html
Monday, November 20, 2006

Types of Crickets


rickets are insects that belong to the order Orthoptera and the class Insecta. Crickets are an important part of the ecosystem since they help in the breakdown of plant material. They are also an important source of food for other animals like small owls, spiders, birds, mice, shrews, snakes, frogs, raccoons and opossums. There are many species of crickets: house crickets, field crickets, ground crickets, cave crickets, mole crickets, camel crickets, snowy tree cricket and the northern mole crickets.

House Crickets: these are the most commonly seen crickets. They are also very troublesome since they tend to enter the house and cause damage. Length of adult house crickets ranges between 3/4 inch and 7/8 inch. They are light yellowish-brown in color and have three dark bands on the head. They have long, thin antennae ,which is much longer than the whole body. They have antenna-like cerci attached to the sides of the abdomen. Female house crickets have a thin, long tube-like structure known as the ovipositor projecting from the abdomen. This is used for laying eggs. Female house crickets can lay an average of 728eggs.

House crickets are generally found outdoors in places like garbage dumps but tend to get into the house when the temperature outside gets colder. They can jump very high, even up to second and third stories of houses. They can also bite if agitated. They feed on silk, wool, nylon, rayon and wood and can thus cause much damage in the house.

Field crickets: field crickets are also a very commonly seen cricket species. They are 1/2 to 11/4 inches in length. They are black in color and have long, thin antennae and a stout body. They have large jumping hind legs. The ovipositor of a female field cricket may be nearly 3/4 inch long. There are many kinds of field crickets and they also vary based on the size. Field crickets make sounds throughout the day as well as night. Female field crickets lay an average of 150-400 eggs.

Field crickets cause much damage to field crops. They also enter buildings and cause damage to furniture upholstery, rugs and clothes. They can fly well and are attracted to bright lights. They are generally found in cold damp places and inside buildings.

Ground crickets: Ground crickets are smaller in size than house and field crickets. They are less than 1/2 inch in length. They are brown in color with long, movable spines on the hind tibiae. Ground crickets' sounds are soft and high-pitched. They are active at night and are greatly attracted to lights. They are generally found in laws, pastures and wooded areas.

Snowy tree cricket: this species of crickets are pale yellowish-green or whitish pale green in color and about 5/6 to 7/8 inch long. They have one black spot on the fore side of each of the first two antenna segments. Wings of male snowy tree crickets are broad and paddle-shaped, laying flat on the back. The female cricket's forewings are narrow and are wrapped closely to the body.

Snowy tree crickets are found in trees, shrubs, high grassy areas and in weeds. They lay eggs on the bark or stems of fruits and ornamental plants, causing much damage. Snowy tree crickets make sounds that vary according to the temperature. These sounds are generally very loud and are usually used for special effects in movies.

Cave Crickets: Cave crickets, also known as camel crickets or stone crickets, are generally found in caves and other cool damp places like house basements. They have very large hind legs, long slender antennae, head bent backward and drumstick-shaped femurs. They do not have wings. They are about one inch in length and brownish in color. They appear to be humpbacked because of their arched backs. They are also nocturnal but are not attracted to light unlike other crickets. They also do not chirp like house crickets. Cave crickets usually reside in wells, hollow tress, under damp leaves/stones/logs/boards. They generally wander into houses by mistake and are basically harmless.

Mole Crickets: Mole crickets, so called because they look like moles, live underground. They are cylindrical in shape and measure around 1.25 inch in length. They are generally brown in color and are covered in fine silky hair. They have paddle-shaped forelegs, which make them suitable for burrowing. The legs are also very sharp to enable root-cutting. Mole crickets do not bite or sting and they also do not damage fabric or paper products unlike house crickets.

Mole crickets generally cause problems to crops since they reside underground and tend to damage the root systems. Female mole crickets lay hundreds of eggs, hence there are very high chances of fast damage if not controlled. Mole cricket eggs hatch in 10 to 40 days. Though mole crickets mostly stay underground, they are good fliers and are found to fly even up to 5 miles, especially during mating periods. Mole crickets feed on small insects, plant roots, tubers, vegetables, underground stems of grasses and earthworms found in the soil.

Crickets provides detailed information about crickets, live crickets, mole crickets, cave crickets and more. Crickets is the sister site of Gatlinburg Cabins Web.

Article Source: http://EzineArticles.com/?expert=Josh_Riverside


Cricket Trap


When I was a kid, my father would choose a weekend for a catfishing trip to Lake Texoma, giving me ample notice to catch lots of trotline bait. The pond I liked to get bait from was full of black perch and bluegill from 3 inches to 3/4 pound each. They liked crickets. Lots of crickets.

It took me an hour after dark to chase and catch a dozen crickets to fish with the following morning. Then the perch ate them so fast that I ran out within a half-hour or so. I had to figure out a better way to supply myself with enough crickets to catch enough perch to run a 100 hook trotline at least four times. That takes a lot of perch and even more crickets.

I noticed that the crickets I needed were on the ground, dead, at the gas station on the corner every morning. They were piled up under the light that stayed on all night. Nowhere else were they so numerous.

That gave me a brainstorm. I went down to the grocer's and begged an orange crate from him. Don't laugh... oranges came in wooden crates in the mid 1950's. The slats failed to cover the entire box bottom, but it allowed air flow. I covered the box with window screen wire on the bottom and sides in order to keep the crickets from escaping. Then I made a tight-fitting frame covered with the same screen wire for a lid and hinged it to the box.

The box was half-filed with torn up lettuce leaves from the grocer and placed outside against the wall of the garage with the lid propped open. This was the trap.

The lure was a simple invention... an extension cord with a garage trouble light plugged in. The key was the red lightbulb. The red light was positioned so that the light fell on the lettuce bed in the box.

The crickets swarmed the red light at night, falling into the lettuce where they remained chomping merrily away all night. All I had to do was quietly remove the light and close the box lid at daybreak and I had thousands of crickets free of charge.

My live tank at the pond was filled on schedule and many church fish fries were supplied with fine catfish from that Lake Texoma trotline.

Submitted by Albert McBee. Copyright December 2006. The author is a 100% disabled Viet-Nam Veteran operating Oklahoma Catfish Charter Service as a catfishing guide and maintaining several websites including http://www.okcharters.com, http://www.precisioncaster.net and http://www.bigboyztoystore.com.

Article Source: http://EzineArticles.com/?expert=Albert_McBee

Friday, November 17, 2006

What Do Crickets Eat?


Crickets are insects that belong to the Order Orthoptera and the Class Insecta. Crickets are an important part of the ecosystem since they help in the breakdown of plant material. They are also an important source of food for other animals like small owls, spiders, birds, mice, shrews, snakes, frogs, raccoons and opossums. There are many species of crickets: house crickets, field crickets, ground crickets, cave crickets, mole crickets, camel crickets, snowy tree cricket and mole crickets.

Crickets are reared and used as bait for fish and as food for some pets. The Chinese also use crickets in medicines. They are popularly used as a sport like cock fights. Crickets are also believed to bring luck. Rearing crickets is very easy since they tend to eat anything. Providing a nutritious diet to the crickets is very important as it helps in breeding. Another reason is that the nutrition from the cricket's diet would be passed on to the pets, which each these crickets.

Crickets are omnivores and feed on almost anything-usually organic materials, plant decay, grass, fruits, seedling plants, fungi and even meat. Crickets need good diet otherwise they tend to feed on each other. Cricket foods are commercially available in the market at feed shops. There are specific brands of cricket feed also. For a few crickets, tropical fish make a good meal though it would be expensive. Rolled oats with fresh fruits and vegetables is an ideal food for crickets. Cornflakes, bread and digestive biscuits can also be given. Crickets also relish fruits like apples, bananas and grapes and vegetables like tomatoes, potatoes, lettuce and cabbage. Chicken laying mash is also good cricket food and is cost effective for feeding large number of crickets. Some food supplements like alfalfa, calcium supplements and raw vegetable scraps can also be added for additional nutrition. The food can be placed in an open and shallow container that is placed firmly on the ground. This container needs to be cleaned regularly to prevent the formation of mold.

Crickets also need a good supply of water. However, keep the water away from the food to keep the food dry and fresh. Insert cotton swabs into the water vessel to prevent the crickets from drowning. Raising crickets is very easy.

About the Author

Crickets provides detailed information on crickets, live crickets, mole crickets, cave crickets and more. Crickets is affliated with Carpenter Ants.

Rainbow Mealworms


Yesterday afternoon we had the opportunity to visit Rainbow Mealworms, in Compton California. This place is truly amazing. Three city blocks of insect heaven. Theres several old houses converted into mealworm rearing facilities. A few of the houses are strictly for cricket breeding. The staff is super friendly, and had no problem giving us a little tour. I'm sure school aged kids would love to spend time at Rainbow Mealworms. The facility is surprisingly clean and neat. the prices are great and the quality of their insects is second to none. There is a tackle shop on the property for those of you who will be using your insects for bait. I can't say enough about how friendly their employees are. I will put some links to their site and pictures of their operation at the end of the article. If you are ever in the southern California area and love insects as much as us, make sure you pay a visit to Rainbow Mealworms.

Worm Breeding


The main work worms do in your garden is tilling and aerating the soil. They burrow very deep, leaving channels through the soil that break up clods and allow air to enter and water to penetrate and drain away.

In the process of eating at the surface and eliminating lower down, they introduce organic matter to the deeper levels and steadily increase the depth of topsoil. Their main role is to digest decomposing organic matter, converting it quickly into a form plants can use as nutrients.

It is important to maintain good soil structure when gardening organically. Unlike mechanical tillers, earthworms do not damage the soil by inverting it, creating hardpans or breaking up the crumb structure. They never have mechanical breakdowns, they do not create noise or pollution, and they use garbage for fuel – an excellent way to dispose of your kitchen scraps, especially if you live in an apartment.

DIY Worm Farming

Commercial worm farms are very practical, widely available, easy to use and are quite aesthetically pleasing. You usually buy them with a small supply of worms to get you started. Choose either Red Worms or Tiger Worms. However, if you already have a suitable 'home' for your worms you don't need to spend the extra money.

A pair of old concrete laundry tubs in a shady spot near your kitchen door or close to your propagating area (or both) is ideal. Have the tubs elevated to make collection of the fertilizer easy. Leave the plugs out and put a strainer in the hole so that any excess water can drain. Fill the first tub with compost and mix in a handful of dolomite or agricultural lime, along with about a half a bucket of soil. Place a bucket under the plug-hole and water this mix with a fine spray until it is quite saturated and starting to drip into your bucket.

Tip in your starter population of worms and cover the surface with an old hessian sack, wet cardboard, old carpet or similar. Worms usually live underground so they thrive in an environment that is cool, dark and moist. You can purchase a tub of 500 - 1000 worms to get started. They are available from professional worm breeders and can be sent through the mail. Many garden supply centres will also have them.

A close-fitting solid lid on your farm will suffocate your worms, so you need to fit a fly-mesh or shade-cloth screened lid to keep out flies and other insects. For the first month you need do nothing except make sure the farm is kept quite moist, but not awash. Once the farm is settled in you should not need to add extra water. If your farm is exposed to rain, make sure the plug is left out or your worms will drown.

The compost itself will feed the worms for quite a long time, but to get maximum breeding it is best to add some supplementary feed every few days, especially as the population starts to increase. Add a dessert-spoon-full of lime or dolomite to each kilo of food. You can vary their feed by rotating between:

- a bucket half-filled with water and cow or horse manure, mixed to a slop and poured over the surface;

- a blender filled with household scraps(not citrus or onion peel or meat) blended to a slop and poured over the surface;

- rotten potatoes, pumpkin or fruit, just placed on the surface;

- half a bucketful of new compost, spread over the surface.

Worms also like:

• soaked and ripped pizza boxes

• shredded and soaked cardboard, paper

• leaves, dirt, hair, egg shells

Worms do not have teeth, so scraps should be cut into small pieces – waste from a vegetable juicer is ideal.

Plants from the onion family (including garlic, leeks and shallots) and citrus fruits contain volatile oils. If any of these are included in the food scraps the worms will climb out of their housing to get away from the smell.

Within a few months the tub should be filled with a writhing mass of worms, and it's time to colonise the second tub.

Half-fill the second tub with the same mixture of compost, lime and soil. Put a strainer in the plug-hole and water the mixture until saturated. Burrow down to the plug-hole in the first tub and put in the plug. Set a hose to just dribbling into the first tub until it is half-full, being VERY careful not to forget it and fill it right up. Leave the hessian on top to exclude light. The worms in your first tub will all migrate into the top half to avoid drowning.

Scoop them out and, reserving some to put in the garden, transfer them to the second tub. Let the plug out of the first tub and drain into a bucket. You are left with a bucket full of very, very rich liquid fertilizer and a tub half full of worm castings.

From now on you should be able to repeat this process every month or so, transferring about a third of the worms out into your garden or feeding them to the chooks each time. This will also ensure that you always have a supply of excellent liquid fertilizer available as well as the rich worm castings. Your plants will thrive!

Hi, I am an avid organic gardener and am known by my friends as the recycling queen. I live on a small country property in South Australia. It is my mission to encourage as many people as possible to start organic gardening. This will improve both our individual lives and the wellbeing of our personal and global environments.

Please visit my website for more great organic gardening tips & information.

Happy gardening, healthy living...

Julie Williams
http://www.1stoporganicgardening.com

Article Source: http://EzineArticles.com/?expert=Julie_Williams

Breeding Silkworms


Silkworms are the larva of a moth (Bombyx mori) native to Asia that spins a cocoon of fine, strong, lustrous fiber that is the source of commercial silk. The culture of silkworms is called sericulture. The various species of silkworms raised today are distinguished by the quality of the silk they produce. Silkworms feed on the leaves of the mulberries (genus Morus) and sometimes on the Osage orange (Maclura pomifera).

Bombyx Mori will not bite, making an ideal worm for feeding most reptiles, amphibians and other animals, and they offer great nutritional value.

Newborn are small enough for most baby reptiles to eat and young silkworms can even be fed so they will grow to a desired size. Silkworms are soft-bodied, slow moving and can grow to 3 inches in length. They are also relatively fast growing, reaching about 3 inches in length and ready to cocoon in as little as 25 - 28 days.

Silkworms go through four stages of development, as do most insects: egg, larva, pupa and adult. The adult (imago) stage is the silkworm moth. The larva is the silkworm caterpillar. The pupa is what the silkworm changes into after spinning its cocoon before emerging as a moth. Since the silkworm grows so much, it must shed its skin four times while it is growing. These stages-within-a-stage are called instars.

Today, the silkworm moth lives only in captivity. Silkworms have been domesticated so that they can no longer survive independently in nature, particularly since they have lost the ability to fly. All wild populations are extinct. Also contributing to their extinction is the extraordinary fact that they only eat mulberry leaves.

Silkworms have been used by researchers to study pheromones or sexual attractant substances. The pheromones are released by female moths and the males detect the chemicals with olfactory hairs on their antennae. This allows the male to find the female for mating. The male antennae are made of many small hairs to increase the chances of picking up small amounts of the pheromones over long distances.

How to Grow Your Worms to the Perfect Size

The great thing about silkworms is that they only grow as much as you feed them, and they can go for a week or two without food. Say you have a couple hundred small silkworms, but you have a big bull frog or iguana. All you have to do is feed the worms as much as they'll eat, keep them warm and dry, and in a few days, you'll have some good sized worms. Have too many silkworms? Not a problem, feed them once or twice a week and they'll stay alive until you need them without growing much larger.

Wash hands thoroughly before handling the worms or the food or they may develop bacterial problems. Using a cheese grater, grate a small amount of food onto the worms and repeat until the worms reach the desired size. For best results, maintain temperatures between 78° and 88° F.

Excessive condensation forming in the container after feeding is the leading cause of failure. If this condensation does form, take the lid off your container and allow the container and old food to completely dry out. In the future, make sure the previous food is dry before feeding again. Old damp food is a breeding ground for mold and other problems, dry food is not.

As the silkworms grow, you may need to transfer your worms to a larger plastic container. The lid needs to have ventilation holes. If not, you need to vent the lid so the silkworms won't suffocate and to allow condensation to dissipate. You can also use a shoebox. The old food and waste matter can be removed, but does not have to be if it remains thoroughly dry.

Under ideal conditions (78° to 88° F and allowed to feed nearly continuously) silkworms can go from egg to 1 inch in length in about 12 days, and 3 inches in under 30 days. The worms will begin to spin cocoons at about 28 - 30 days old or when they are between 2 1/2 and 3 inches long.

From Cocoon to Moth

Silkworm moths emerge from their cocoons after spending about two to three weeks metamorphosing. As moths, they do not eat or fly. They will usually mate, lay eggs and die within a week. Fertile eggs turn from yellow to gray or purple in a week or so. If the eggs don't hatch within 3 weeks, they usually will not hatch until the following year (see above—from egg to larva).

Proper Handling Procedures

Again, in order for your worms to stay healthy for many weeks, you'll need to keep the silkworms as dry as possible. If condensation builds up during feeding, vent the container lid to prevent excess humidity.

Be sure to wash your hands thoroughly before handling the worms or their food. Silkworms can be susceptible to bacteria if you don't properly handle them. As long as the container environment remains dry, your worms will be fine.

Mold develops from high temperatures and high humidity. If the worms are covered with droppings, silk and old food for too long, mold may develop and kill the worms. If mold does develop, grate about 1/4 inch of food (sold separately) all over the worms with a cheese grater. As the worms crawl to the top of the new food pile you can transfer them off the moldy food and place them into a new container.

Silkworms are susceptible to bruising and dying if not handled with care, especially as they grow larger. When handling and transferring the worms, be very gentle.

Shop for Silkworms

Wednesday, November 15, 2006

Butterfly Garden


Creating a butterfly garden is a little different from the standard flower garden, but that does not mean you need to be without any favorite flowers or fragrances. Many butterfly attractants are just as attractive to humans as they are to butterflies. Flower gardens are already naturally attractive to butterflies because they are always seeking sunny spaces with brightly colored, fragrant flowers.

Where you live always has a great deal of impact on your garden. Fortunately, when it comes to butterfly gardens, the NABA (North American Butterfly Association) has done much of the work for you by creating region specific brochures about butterflies and their attractants. Take a look before planting your garden. But here are the basics to get started.

Basking

There is almost nothing as important in attracting butterflies to your garden than bright sunlight. Butterflies thrive on sunlight. Butterflies are insects, and as such, they are cold blooded and need sunlight to heat their bodies to make them active. Just provide sunny spaces the butterflies will come to bask.

Butterflies also like a bit of water. This is especially important to remember in arid regions where natural sources of standing water are hard to find. Garden fixtures, like fountains, can provide places for butterflies when water is scarce. Butterflies are equally pleased with sun-warmed stepping-stones and little patches of run-off water than might remain around your garden or on a walkway.

Waterfalls really attract butterflies, the light sprinkle of water that lands on stone and dirt a bit away is ideal for basking butterflies as it allows them to warm their bodies and receive nourishment from mineral deposits within the water. Use a tall, decorative waterfall as a backdrop for a butterfly garden with a reasonable amount of space around it or use a smaller, more delicate water source like a watering can fountain in a tighter space. Watering can Fountains: http://www.garden-fountains.com/Categories.bok?category=Watering+Can+Fountains

Try to arrange your garden in a very bright area of your yard. It is generally recommended that any area that you are thinking of placing a butterfly garden in should get at least 6 hours of direct sunlight a day. If possible, enhance basking options for your butterflies with various pieces of garden statuary like an elegant birdbath. For birdbaths, visit: http://www.garden-fountains.com/Categories.bok?category=Bird+Baths

Eating

Nectar is a major attractant for butterflies. Plant your highest nectar sources in the brightest sunlight since most butterflies only feed in the sun. Depending on where you live there are certain flowers that will help attract specific species. There are a few general hints available.

Butterflies are attracted to especially bright colors, and large patches of bright colors are more likely to catch their eye. Try planting clumps of vivid pink, red, orange and yellow flowers that will stand out in a sunny place.

Butterflies are also commonly fond of flowers with flat tops and relatively shallow throats. Butterflies reach into a flower to get at the nectar so flowers with shallow throats are easier for them.

A few specifics

Butterfly bush is an aptly named deciduous shrub and grows easily in many climates. There are quite a few varieties of Butterfly bush. It grows on long arching stems and produces clusters of tiny, fragrant flowers (rather like lilac). They flower in a wide range of bright colors and are relatively easy to grow.

If your soil is a little dry, Butterfly weed, also known as milkweed, will probably grow well and do much to attract a variety of butterflies. Most butterfly weed blooms late in the summer and is between one and three feet high. The perennial has red, orange and yellow flowers. Butterfly weed is also a host plant for several kinds of butterflies.

Growing

While you may be thinking that you can't "grow" butterflies as you do flowers, you can grow the foods that feed caterpillars, which will then make your garden their home.

Host plants are essential to a butterfly garden if you are hoping to do more than just attract those that happen to be near. Many butterflies have short lives, so if you want your garden to be a flutter with them, the best bet is to help them grow yourself.

The previously mentioned butterfly weed is one of the most common host plants for monarch butterflies. Many of the plants that are the best host plants for butterflies are weeds, like Queen Anne's Lace, nettle and thistle. Different species like different foods so make sure to provide the right food for the right butterfly. For best results, grow primarily native plants in your garden, this will attract butterflies in the area. Non-native plants may be harder to grow and there may not be butterflies in your area attracted to them. Whatever you do, don't use pesticides in your butterfly garden. Pesticides will kill the butterflies you've been trying to attract as well as any other insects in your garden. Remember that you are planting host plants so that they become food for caterpillars so if they are being eaten they are doing their job.

About the Author

Elizabeth Jean wrote this article for Garden-Fountains.com. She recommends you visit them for Bird Baths, Garden Statues, and all types of Water and Wall Fountains.

Insects As Pets


Often people look for a pet that is out of the ordinary. Sometimes a normal cat or dog just won’t do! Though, it is always wise to know what you’re getting into. Here, then, are the top five non-traditional pets:

5. Scorpions

There are many species of this particular creature, and the strength of their venom varies between species. The most commonly found pet species, the emperor scorpion, is not particularly dangerous. Its sting can be compared with that of a bee or wasp, though like bees, there is a chance of an allergic reaction.

Scorpions do not require a great amount of care, but are not an ideal pet. Handling a scorpion is not a good idea – Besides the risk of its sting, scorpions become very stressed when handled, a health risk to the creature itself. Also, the animals can live up to 8 years, making them a long-term commitment kind of pet.

4. Cockroaches

Hissing Cockroaches – These insects are great for beginner pet-owners! They are quite docile and require little maintenance. Though they’re not of the “cute and cuddly” variety of pet, they are quite interesting. They hiss when disturbed, and males will hiss while courting a female. Sometimes, for reasons unknown, the entire colony will hiss in unison.

Hissing Cockroaches are best kept in a large tank with wood shavings. Water and fresh fruit and vegetables are all they require. They are hardy creatures and can live up to five years.

3. Tarantulas

This fascinating creature has become a more popular pet in recent years. There still remains some fear in potential owners, though keeping a tarantula as a pet is often more harmful to the animal than to the pet owner. Tarantulas can die even from a short fall, if their abdomen ruptures.

Tarantulas are venomous, but in most species, the toxicity of their venom is akin to a bee or wasp sting. In some cases, a person can have an allergic reaction to spider bites, in much the same way that some react to bee stings.

There are hundreds of species of tarantula, and some are more aggressive than others, so potential owners really need to do research before purchasing one. Tarantulas are fascinating, quiet, and in most cases, need little space.

2. Ants

Purchasing an ant farm is the easiest and simplest way to keep and maintain this interesting pet. With an ant farm, you only need to feed your ants once per week, making them a very low-maintenance pet. A small crumb of bread soaked in sugar water is enough to feed your whole colony for a week!

1. Rats

Rats have a life-span of two to three years and are considered quite social and intelligent. They are also easy to tame and are very gentle. Though they are nocturnal, they tend to adapt to their owner’s schedule. Due to their social nature, they should also be kept with other rats.

Rat owners compare their care to that of a dog – they require a lot of attention and at least an hour of exercise per day. These curious and playful pets are easy to care for, but not necessarily low-maintenance.

This article has been submitted in affiliation with http://www.PetLovers.Com/ which is a site for Pet Forums.

Tonia Jordan is a freelance Journalist and a writer on Writing.com.

Article Source: http://EzineArticles.com/?expert=Tonia_Jordan

Sunday, November 12, 2006

Breeding Mealworms


Mealworms


If you wish to purchase and store mealworms, they can be kept in the fridge for several weeks (be sure to provide ventilation holes in the storage container). When kept cooler they will not grow quickly and will be quite lethargic. Otherwise, your mealworms can be kept at a range of temperatures between 75 and 80F (room temperature is often sufficient).

They are the larval stage of a beetle. Mealworms have four life stages:

1. Egg (about 1/20th of an inch in size)

2. Larva (this is the worm used as your food source)

3. Pupa (looks like an alien out of a science-fiction movie)

4. Beetles (these are what breed and lay the eggs)

Mealworms will reach a maximum length of roughly one inch after molting approximately 5 times.

Breed your own?

This can be fun and the children can have some trouble free and useful pets. They don’t take up much space and are quite entertaining when wresseling a large piece of bran flake or performing community munching on a slice of potato….

Environment:

Mealworms are one of the easiest feeder insect to house and can take up very little space. Many people opt to keep their mealworm colonies in:

1. Small glass aquariums

2. Plastic storage boxes

3. Plastic storage drawer systems

4. Plastic food containers

For your colony, you will want to use a container that:

1. Has smooth sides to prevent the worms from crawling out and escaping.

2. Is easy to disinfect periodically.

3. Allows ample ventilation and air to circulate freely to avoid the build-up of potentially harmful mold and bacteria.

For providing the necessary ventilation you can:

1. Use a screened lid for your aquarium.

2. Cut a large section out of a plastic lid (you can also cover this with mesh).

3. Or leave the lid off the container completely.

Its important to provide roughly 3 inches of high-quality and nutritious substrate for the worms to burrow in and eat. Many people keep their mealworms on a simple substrate of oat bran. I like to provide a nice variety in their bedding (which they eat).

Suggested Menu: Rolled oats, wheat or oat bran, bran flakes, shredded wheat (all crushed for easy eating).

Vegatables are there primarily to provide water to the mealworms. I like to provide think slices of vegatable, like potatoe, carrot or brocolli (thou brocolli can smell a bit). Vegatables should be scrubbed to remove insectasides or peeled to remove the chemicals that way.

For preference, slice pieces of scrubbed veggies and lay them onto the bedding with the skin touching the bedding, thus minimising any chance of making the bedding damp and causing mould.

Every couple of months, replace and replenish the substrate as well as remove any fecal matter that has accumulated on the bottom. Remove any dead mealworms/pupae/beetles that you might see, on a daily basis.

Breeding mealworms is actually a very simple process They practically breed themselves with no extra work on your behalf. Some people will choose to breed their mealworms in the same enclosure while others like to separate the various life stages (ie larvae, pupae and beetle). I use old Tupperware type boxes without lids – they don’t seem to want to leave…

It is a good idea though to remove the pupae into their own container until they have turned into beetles at which point, you can move them in with the rest of the beetles. It is not uncommon for the worms and beetles to munch on the pupae.

If you want to start breeding your own mealworms, start with a around 50 – 100. I keep my breeding stock away from the bird feeding stock, simply to concentrate on the breeders, although I feed my bird-feeding stock, seems like the least I can do for their final days …

The worms will turn into pupae and after approximately 10 to 15 days, they will emerge as beetles. The beetles will breed and lay the eggs. The beetles start to mate and lay eggs within several days (roughly 1 week) of pupating and will continue to do so for approximately 4 months (after which they die).

The female beetles tend to be significantly larger than male beetles. These females can typically lay up to 500 eggs throughout their lifetime. Each egg is roughly 1/20th of an inch and sticks to the substrate so chances are, you will not see the eggs. The eggs hatch about 1 week after they were laid. These worms will achieve optimal growth rates when kept between 75 and 80F.

Take care when cleaning and replacing substrate that you do not accidentally throw out the eggs or baby worms!

Cricket Suppliers


Heres a list of cricket suppliers. I hope this helps you start breeding crickets or other insects. Keep in mind that we are not associated with these suppliers, I just wanted to give you some resources. Remember that you need at least 50 crickets to start your colony. I prefer to start with between 150 t0 250 crickets.


Worm Man
Flukers Crickets
American Cricket Ranch
Big Apple Herp
LLL Reptile
Reptile Guru
Prehistoric Pets
Southern Cricket
Ghann Cricket
N. Y. Worms
Bug Order
Reptile Food

Silk Worm Shop
Rainbow Crickets

I hope this helps you find what you need to get started. Check back soon for lists of suppliers of mealworms, roaches, superworms, wax worms silk worms. I start my new colonies with crickets that aren't quite full grown. This will allow time for breeding and egg laying before they die. Remember breeding crickets is fun and easy and once you get started you might have more crickets than you know what to do with.

Friday, November 10, 2006

Low Price Food


More and more stores have started to sell food for insects. But this food is often very expensive making the savings of breeding at home nil. So I've put together a list of low price food for most feeder insects. I'll break them down into the individual insect species.

Crickets
While some breeders feed crickets exclusively grain foods, I've found this provides the crickets with none of the protein that your pets require. Here's an inexpensive recipe I've been using for a while. The main ingredient is dry cat food, followed by bran or oats, as well as vegetable scraps.
Start by blending the cat food dry, making a fine powder (you could use a food processor as well).
Mix about 3 parts cat food to 1 part bran or oats. If you like you can add fish flakes or other dry grains, but these could get expensive. And for moisture I've Found that carrots or potatoes work good. You could also use a simple sponge placed in a jar lid. Just make sure the sponge is clean and doesn't contain any soap. I purchase all these items at my local dollar store. There is no need for premium ingredients.

Mealworms
For meal worms I use a simple mix of bran and oats. I purchase these from my local feed store in big bags that last months. I also like to add some of the cat food as well. I've found the protein and brewers yeast that is in the cat food helps the mealworms grow faster and larger. I use to use carrots or potatoes for moisture, but have just discovered cactus pads are the best moisture source. When they are finished there is only a thin cactus skin left. The cut pieces also don't mold either.

Roaches
Feeder roaches are even easier. I provide a slice of inexpensive bread or just left-over bread scraps from the kitchen. I also provide a small dish of the cat food as well. For moisture I like the sponge in the shallow dish.

I hope this has been informative, and remember that most of these insects can eat simple vegetable or fruit scraps. So before you try the expensive commercial food try some cheap home made recipes first.

Gutloading Crickets


Gut Loading Crickets

Many new reptile owners aren't aware that the crickets that they purchase from their local pet store lack the nutritional value that their reptile needs. This is especially true of the large chain pet stores that simply ship the crickets in and keep them in drawers just long enough to sell. The old expression applies to you favorite pet too "you are what you eat!" We will try to give a brief overview of not only how to feed, but what to feed crickets.

The process of feeding" the food" is called gut loading. The process is simple. Prior to feeding your reptile, place the crickets in a container with nutritious food and a moisture source. We recommend the Critter Totes specifically made for crickets. These small cages allow easy feeding of reptiles without cricket escapees or direct handling of the crickets.

Our diet consists of equal parts dry dog food, rolled oats, bran, & chick starter mash. Basically any non sweetened feed or cereal will work as the base food. We grind this food in our blender. This may sound like overdoing it but we keep and breed quality reptiles and believe that healthy feeders are the foundation for happy and healthy pets.
They will also need a moisture source. Some cricket keepers use chick waterers or wet sponges, but we have had nothing but trouble with water in any form in our cricket cages. So we prefer using fruit & veggies as moisture sources. We usually use whatever is growing in our garden at the time, some great choices are orange slices, carrots, potato pieces, prickly pear, or any kind of greens.
In Review
Keep the crickets in a plastic box with nutritious food (any dry pet food or cereal) for 24 hours before feeding them to your pet. Add a moisture source (any fruit or veggies) Make sure to remove old veggies on a daily basis to prevent any mold or fungi.

Hey Guys


Hey guys,
This is my first article here at blogger. A little about myself. I've been raising and breeding reptiles and birds for years here in sunny California. As my hobby grew I found supplying a high quality diet became expencive and time consuming. So with little effort i began raising my own feeder insects.

I have to admit that breeding and careing for these insects has become another enjoyable habby. I have found that with little cost and effort you can raise plenty of feeder insects with simple house hold items in a small space, like a closet or corner of your garage. I will try my hardest to explain in clear articles the steps to start and maintain feeder insect colonies on small or large scales. So please check back often to learn how fun and easy raising insects can be.
Thanks,
TheBugGuy